Not the only way, but the way we've done it that works. An important word: what you find here is an IMCOMPLETE record of the process, created for a student who was unable to complete his boat at school. As time goes on, I may fill in steps, but this is by no means a full set of directions. When it comes out soon, I recommend the book Building Skin-on-Frame, Double-Paddle Canoes by Hilary Russell,of Sheffield, MA.

Order of Operations

  • Creating the Stem-Knee assembly
  • Attaching Knee to Keelson
  • Fill four spaces in gunwale for thwart attachment
  • Sand gunwales and breasthooks
  • Attach thwarts
  • Fit, drill gunwale rub rails
  • Assemble floorboards
  • Shape nose and tail for brass rub rails
  • Coat all wooden parts with oil or varnish: frame, rubs and floorboards
  • Skin the boat
  • Shrink the skin
  • Skin coating
  • Attach all rubrails, wooden and metal
  • Last odds and ends

Notes on related subjects

5.23.2010

Odds and Endings

In no particular order:

Grab loops.  A couple short lengths of  7 or 8 mm perlon (climbers cord) make nice grab or hanging loops at each end.  Make a loop, tie the two free ends together with an overhand knot, and shove the loop through the hole in the breast hook from inside, so the knot catches under the breast hook.


Seat cushion:  in the past I've used some of the leftover canvas to cover the chunk of seat foam.  This year I tried using some of the fabric dye to color the cushions - not a good idea, as it turned out;  the dye ran when Matt and Peter tested their boat, so I had to remove the covers and wash them in hot water to resolve that problem.  Hence the pinkish faded color in this photo.


Maker's mark:  The little bronze tag that says Sarum Boats.  Easy.  Drop into the shallow hole and pin with two tiny brass brads.


Paddle note:  While a skilled paddler, can pilot this boat with a single bladed canoe paddle, using the 'J-stroke', the boat is a joy to paddle with an extra long double bladed kayak paddle.  There are some links to manufacturers on the Sarumboat blog.  A little research on the Internet will also yield sources of plans for building your own, if you wanted to try that.  This paddle will seem unusually long, compared to what you might find at the average EMS.  Mine is 260 cm (102 inches).  We made some here at school which are about 8' 4"  (by the way, rubber drip rings are a good idea for your paddle shaft - they prevent some of the water picked up by the blades from running into the boat.)


Rubs

Reattaching the wooden rub rails aver the staples is easy - just screw them back in.  I recommend doing it by hand (tedious, but a good wrist workout) or using a drill with adjustable torque settings, set so that the clutch slips before you can crank the screw too hard.


The bronze stem bands are a bit trickier.  Start with the boat upright, and place the bronze 1/2 round on the breast hook and in contact with the stem.  Drill pilot holes for the first two screws.  The screw pack has enough longer screws for two at each end of the boat. Use the short ones everywhere else. Once the band is attached with the first two screws, turn the boat bottom side up and proceed.


Screw pack.


Start by anchoring the rubstrip on the breasthook.


Last screw on the underside of the boat.


The bronze 'rub' or stem band tends to bend more easily and sharply where the holes are drilled, so place the screws one at a time: drilling, screwing, aligning and bending as you go.  Run a narrow (1/4") bead of silicone down the keel stringer where the stem band will lay, to seal the screw holes and the staple seam (though this may be redundant, given the properties of the polyurethane).  When the band is screwed down, wipe and excess squeeze-out of silicone off with a rag.  Vinegar works well to clean up smears on the skin.

5.15.2010

Coating the Skin

The material we have been using for the past two years to coat the skin of the boats is a two-part polyurethane that we purchase from the Skinboat Store, in Anacortes, Wa. This is mixed one part A to two parts B and stirred THOROUGHLY. It needs to be well mixed to set properly, and believe me, to be left with a sticky, uncured mess on your boat skin would be a disaster of the first magnitude. On kayaks, the best way to apply this is with a scraper/squeegee, but with the additional stringers and multiple lashings making small bumps on our skins, the best way is with a disposable foam brush. Three coats can be put on a few hours apart, though in our school setting we have done coats on successive days, and it has worked just fine.

In the photo below, an acid dye (also from the Skinboat Store) called Russet (they carry 8-9 colors) has been used to color the canvas at the same time we shrink it. If you use just the polyurethane with no dye, the color will be a pale, yellowish transparent film, almost like skin of some sort.  To shrink the skin with no dye, just put the boat out in the hot sun, and hose it down with cold water.  Then let it dry.  If using the dye, but the dye in a spray bottle, and with a rag in one hand and the sprayer in the other spray evenly and then wipe to prevent runs. Once the entire boat is done, let it dry in the sun.


A perfectly good alternative is water based polyurethane from the hardware store. It dries fast; you can put on a coat every few hours, and build up to 5 coats quickly. For an opaque, color coat, mix ¼- ⅓ artists’ acrylic gesso and some acrylic paint of your choosing with the polyurethane for the first couple coats. Brush it as evenly as possible to avoid brush marks. Finish with 3 more coats of poly.

5.06.2010

Skinning the boats


We've given the Waterlox Marine several days to dry.  If we were using water based polyurethane, this would not have been necessary.

Start by laying out the nylon canvas over the inverted boat frame.  Make sure it hangs far enough over each end so you won't come up short when you stretch the canvas over the stems.


The first staples go in in the center of the boat, in the center of the gunwale, running parallel to the line of the gunwale.


Put in five or six on each side, starting in the middle.  After doing the first side, go to the other side, and while pulling the fabric as tight as you can, staple the opposite side.  Now, work your way toward the ends, first one way, then the other, alternating sides;  put in a few staples, then go to the other side, pull the fabric as tight as you can, before stapling.  This can be tricky - you need to accomplish three things with two hands: pull the fabric taut, back up the gunwale with the same hand, and staple with your dominant hand.  If the staples don't go quite all the way in, you can tap them flush with a hammer.  If they go seriously askew, pull them and try again.


As you work toward the ends, you should be pulling not only straight down, bu diagonally towards the ends.  You should try to pull tight enough that all the big wrinkles begin to smooth out.  (small folds from the fabric being stored folded will go away when you shrink the fabric.


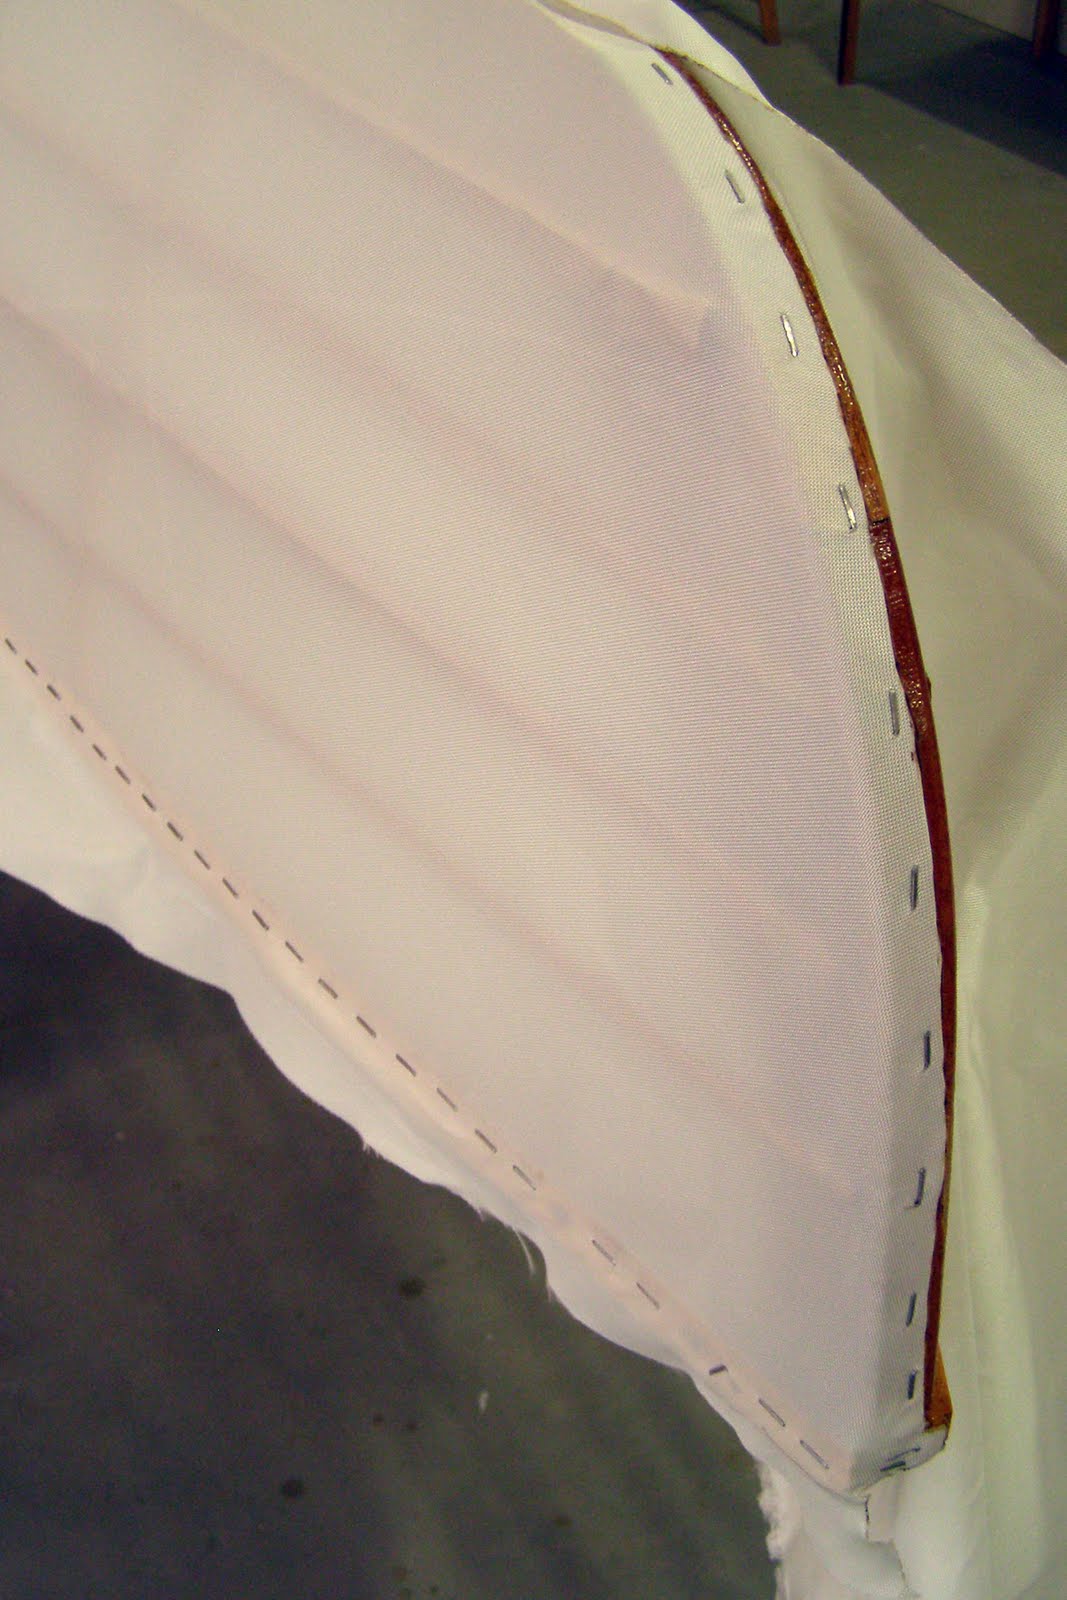
When you get close to the ends, instead of stretching between the gunwales, you'll be stretching the fabric between the keel and the gunwale on each side, to cover the 'triangle' on each side.  Do one side first, stapling from about the first rib, toward the tip, leaving enough space between the staples to fit a second staple.


Once one side is done, use the hot knife to trim the fabric even with the edge of the stem away from the side you've just done.  If your staples are correctly down the middle of the keel and stem, then there should be a good 1/4 inch of fabric outside of the staples, which is sufficient.


Your cut should end at about the first rib.  Carefull not to cut into the lashing.  You should not have to cut beyond this point. When you pull the second half over, it will just barely reach (see above), but as you get a couple of staples in there should be ample to overlap the cloth and get a second line of staples in.


Pull the other side across in the other direction - remember, you are now stretching not from gunwale to gunwale, but from keel (and stem) to gunwale. Get the canvas as taut as possible over this triangular end of the boat, and staple a second row of staples, along the same line as the first, but in the space between the first line.

THE SCARY PART: now you have to use the hot knife to cut away the top layer excess, without cutting into the first layer.  You can lay a layer of duct tape, as insurance, over the first layer, right up to the stapes, but even so, the best way to do this is to pull the fabric out straight, away from the boat a pull as you cut, so the just melted and severed nylon will pull free as you move CAREFULLY down the cutting line.


Finish the ends as neatly as possible, as in the above photo.
Then use a hammer to make sure all the staples are tapped in completely, and cut the remaining fabric off just inside the edge of the gunwale, with the hot knife.


4.24.2010

Gunwale Rubrails


Start fitting the rub rails by laying them out along the gunwales and clamping them on flush with the tops of the gunwales.  Drill pilot holes for the screws through each rib, plus one in each side of the breasthook.  These should not go all the way through the inwale; rather, they should stop about an eighth of an inch short.  These holes also need to be countersunk enough for the heads of the bronze square-drive screws to be flush or just below the surface of the rub rails.


Trim the rub rails even with the ends of the gunwale and stem.  Then, remove the rubrails from the boat and round the outer two edges.  Do NOT round the edges that will be against the canvas.  The outer rounding is so when you bump your hand on the rubrail while paddling - and you will, occasionally - it will be soft and more comfortable.

At this point the rub rails are ready to be oiled or varnished.  Both sides, 2-3 coats.

4.21.2010

Shaping the Ends of the Boat to Fit the Bronze Rub Rail

One of the very last things to go on the boat is the metal rub-rail which wraps over the breast hook and along the stems onto the keel stringer.  When you bend the piece in a vise, you can't quite get a sharp 90 degree angle, so what we do is round the top of the stem and gunwale to match the curve we do get.  Do this now, before you oil the frame and other parts.  Use the metal part as a guide, and sand by hand to get as close as you can to the required radius, but don't beat yourself up too much if its not perfect.  As long as the arms of the metal piece lay flat on the stem and breast hook, it will be fine.

The installment of this piece will be covered later; for now, I just want you to have shaped the ends before oiling.

Note: when you do this shaping, you can save time later by putting the wooden rub rails on while you do the shaping, so they will match the profile of the bow and stern.  Also round them off nicely on the outside.


This is what you'll need to do if you forget to round the rubrails when you round over the bow and stern.  It seasy enoughn to go back and mark themto match and round off the ends to match the boat.  A little Waterlox touch -up with a small brush will be required.

4.19.2010

Floorboards

The floorboards are constructed separately, from strips of ash, 1/4" thick by 1" wide. Actually, you could have a lot of variation in these - 3 wider pieces instead of 5 narrow. Whatever prevents you from sticking a foot or paddle thought the open grid of the boat frame and provides a platform to sit on. We usually place the three cross-pieces (1) under the paddler, (2) near front thwart, and (3) in the middle. Make sure they will fit between the ribs of the boat, so they will lay flat.


The ends are left relatively unsupported so that they can bend up and twist a little to conform to the narrower boat ends. The pieces are rounded on the upper edges for comfort and the tips are rounded off a little - no sharp edges or points.


The pieces are secured to each other by pre-drilling holes and using copper tacks driven through and 'peened' over on back side.  They are glued with waterproof glue at the same time.

4.17.2010

Finishing the Gunwales and Breasthooks


If you are at a point where the breasthook looks like this, it needs to be sanded to look like the one below.


To be most efficient, this is the time to fill the space between the gunwale and inwale in those four places where the thwarts will be attached. The rear thwart is 13 inces behind the center of the boat, and the front one is 39 inches in front of the rear thwart. Find the space that best meets these criteria. This gets filled with a short piece of ash, glued and clamped. When the glue is dry, the entire gunwale and the bresthooks can be sanded smoth and flat. DO NOT round off the outer spruce edges of the gunwale (the rubrail will attached here, you don't want to create a gap), though you could do this to the inside edges for handling comfort.


All the rib ends which are sticking up will sand very easily and quickly. The ash gunwale will take a bit more work, but be careful as you are smoothing the gunwale to keep the lines as fair as possible.

4.16.2010

Attaching the Thwarts

Now that the gunwales are cleaned up, you have to drill some holes in them!  Only four. Remember, the rear thwart is 13 inces behind the center of the boat, and the front one is 39 inches in front of the rear thwart.  The ash filler pieces are installed. 

Now you need to fit and cut the thwarts to their finished length.  They should fall a bit short of the gunwale on either end; the canvas should not touch them when it is on the boat. In the photo below, you are looking at the outside of the boat. That end should be cut at a compound angle: parallel to the outer gunwale.  You can see the pencil line in the picture - the one one top is easy, just trace the gunwale.  The vertical line on the thwart runs along a line from the guwale to the first stringer.  This means it will slant in a bit at its bottom edge.  The drawing below may show this better (angled face 2). After you draw the lines, you want to cut a bit (1/8") inside of the lines, so the canvas of the boat will not touch the end of the wood.


You can also see, in the drawing, the upper angled surface.  This is created so that the thwart will fit more solidly to the undrside of the gunwale, which is slightly flared outward.  This is about an inch long and takes off about 1/8" at the end.  It can be done with a sander,or a sharp plane.


You need to drill a hole through each filler piece, where the thwart will be bolted to the gunwale.  Drill parallel to the gunwale side (imagine poking the drill through that space if the filler wasn't there).

The finished attachment looks like this (below).  The clamps marks, by the way, will be covered by the canvas and rubrails.

4.15.2010

Skining the Frame

coming soon.....

Coating the Frames

Oil or varnish?


I have made these boats using only water-based polyurethane to seal them. This has the advantage of slightly lower cost, water clean-up and lower V.O.C.s. Dries quick, too. My first boat was done with this, and its has stood up very well.

More recently, we have been using Waterlox, a commercially available, tung-oil and resin wood finish. I like to use two coats of the 'origianal' type, followed by a top coat of the marine version of the same product, which, rather than soaking in and filling the grain, leaves a more varnish-like gloss coating on the surface. It takes a while to thoroughly dry, particularly if there are thick spots or drips around the lashing, etc. Brush it out as thin as you can, and give it several days to dry, preferably in the sun.

The most efficient way to do this is to have the boat frame, the two rub-rails (for the gunwales) and the assembled floor boards all done, so you can finish them all at the same time.  With a few home-made 'pin boards', it is possible to coat both sides at the same time.